
Zenless Zone Zero Beginner Guide: Combat, Agents, Gear, and City Systems
This Zenless Zone Zero beginner guide explains fast-paced combat, Agents, equipment, exploration, Hollow Zero, and Shiyu Defense.
As of 2026, Zenless Zone Zero remains a stylish, fast-paced urban fantasy gacha action RPG from HoYoverse. It is a new IP that borrows ideas from the Persona series, visual novels, and fighting games, while building its own identity around assists, parrying, dodging, and flashy team combat. This guide is for players who want a clear, beginner-friendly explanation of the game's core systems without meta or gacha advice. It covers combat, Agents, equipment, city exploration, Hollow Zero, and Shiyu Defense in a straightforward, descriptive way.
Core Combat Mechanics ⚔️
Zenless Zone Zero combat is packed with five core mechanics: Energy, Decibels, Assists, Dodging, and Daze. Anomalies are covered separately because they add elemental reactions on top of these basics.
-
Energy: Skills can be performed without Energy, but their EX version makes most Agents invulnerable and deals increased damage.
-
Decibels: This resource allows any Agent to use their Ultimate skill, a signature move with a cutscene. It is capped at 3000. Decibels are gained in the same manner as Energy, and Anomalies grant a bonus.
-
Assists: A Defensive Assist is triggered by timing the assist button when the enemy flashes orange. It counters the enemy's attack, creates Daze and Energy, and interrupts the enemy briefly if countered fully.
-
Dodging: Timing a dodge with any attack performs a Perfect Dodge. Following with an attack performs a Dodge Counter. An Evasive Assist is triggered by timing the assist button when the enemy flashes red, briefly slowing time and nearby enemies.
-
Daze: When an enemy's Daze gauge reaches 100, it starts draining to 0 while granting a higher damage multiplier, starting at 150%. This window can be extended through Chain Attacks; more Agents mean more chains and a longer window.

Agents, Attributes, and Roles 🎭
Characters, also called Agents, have four characteristics that define team composition: Attribute, Specialty, Attribute Anomaly, and Range-type. All characters deal Physical damage and Elemental damage, but some also deal pure-elemental damage in certain ways. Agents can do more than their Specialty's job based on their Core Passive and Skills.
Attributes include Physical, Fire, Ice, Electric, and Ether.
| Specialty | Role |
|---|---|
| Attacker | DPS-focused Agents who deal massive damage, especially when the Daze gauge is full. |
| Stun | Daze-focused Agents who fill the Daze gauge quickly and create openings. |
| Support | Buff- or Debuff-focused Agents who enable others to deal more damage. |
| Anomaly | Reaction-focused Agents who create Anomalies faster than others, making openings and dealing substantial damage. |
| Defense | Tank-focused Agents who take damage for the team, have high defensive stats, use counter-attacks with high Daze multipliers, and grant defense buffs. |
Range-type matters because Melee Agents have Defensive Assists, creating more Decibels and causing more Daze damage. Ranged Agents have an Evasive Assist, slowing time briefly and following up with a dash attack similar to a Dodge Counter after a Perfect Dodge.
Anomalies include Physical Assault and Flinch, Ice Freeze, Shatter, and Frostbite, plus Electric, Ether, and Disorder effects. When enemies suffer an Anomaly of an element they are weak to, their attacks are interrupted. Anomalies seem to be triggered mainly by Basic Attacks or specific portions of some skills.
Skills and Chain Attacks 🧩
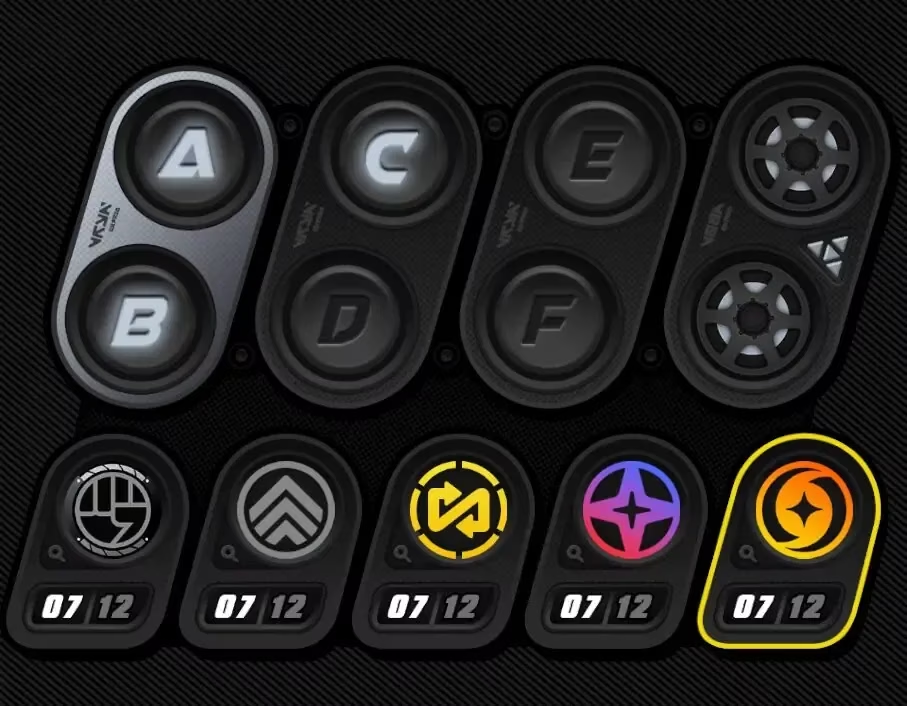
Each character has six Skills. Aside from presentation, they contain several abilities related to their input. The top two rows are Core Skills, and the bottom row includes Basic Attack, Dodge Skills, Assist Skills, Special Skill, and Chain Attack.
-
Core Skills: Contains the Core Passive and an Additional Skill. The Core Passive affects the main source of damage and defines the character's role. When enhanced, it increases only the Core Passive's stats, not the Additional Skill. The Additional Skill increases damage or stats when performing certain actions and meeting a composition criterion, such as same element or same faction.
-
Basic Attack: The standard attack string.
-
Dodge Skills: Besides normal Dodge and Dodge Counter, these can include abilities performed under certain Dodging or Dashing conditions. Hitting an enemy with a Dodge Counter can knock them back and interrupt them.
-
Assist Skills: Includes Quick Assist, Defensive Assist, and Assist Follow-up. Quick Assist is performed when a character is hit or knocked, quickly swapping to the next character and entering a Dash state. Defensive Assist is performed on an orange flash and a key sound. Assist Follow-up is an attack performed by using a Basic Attack right after a Defensive Assist.
-
Special Skill: Can be performed at any time, resets the combo, and deals Elemental Damage. The EX version requires Energy, grants invulnerability, and deals massive damage, especially when the enemy is stunned.
-
Chain Attack: When the enemy's Daze gauge reaches 100, a Select Agent menu appears for 2.25 seconds. Chain Attacks generate Decibels and Energy, deal damage, and make the active Agent invulnerable during the animation. They also reset the Daze gauge drainage back to 100 each time, up to three times.
Small enemies grant one Chain Attack. Medium enemies grant two, or three if only one enemy is present in some cases. Bosses grant three, with the final Chain Attack including the Bangboo's A skill. The number of available Chain Attacks is also affected by squad size. If only one Agent is used, the Chain Attack will not trigger.

Enemies and Counters 🛡️
There are three enemy sizes: Small, Medium, and Bosses. Each type has its own behavior in terms of attack frequency, counter method, and moveset. All enemies have a Daze gauge and can be inflicted with Anomalies. Encounters can include up to six small enemies, two mediums with one small, one medium with three smalls, or a single boss. Some bosses have two phases and a certain theme.
All enemies have two types of attacks that the player can counter via Dodge or Assist. I-frames, or frames of invincibility, are very important, and there are plenty during a dash. Some enemies do not flash when attacking; these are mostly ranged attacks that certain melee characters can block. When performing a Defensive Assist, the character is pushed away from the enemy. During this brief window, multiple counters can be performed when timed correctly, although not all characters can do this due to animation speed or follow-up patterns.
Gear: W-Engines and Drive Discs ⚙️
Agent equipment is divided into two sections: W-Engines and Drive Discs. W-Engines are orbs that represent the Agent's weapon or characteristics. They range from B-Rank to S-Rank and have base stats, advanced stats, and a W-Engine Effect that requires the Agent's Specialty to match the engine's condition. If matched, the Agent gains the effect; otherwise, only the advanced and base stats apply. B-rank Engines can be dismantled for materials and EXP. A-rank Engines can be crafted using Combat Simulation materials. S-rank Engines for certain characters can be obtained via the 24-Hour Store at the Signa Store tab using Residual Signal from duplicate characters.
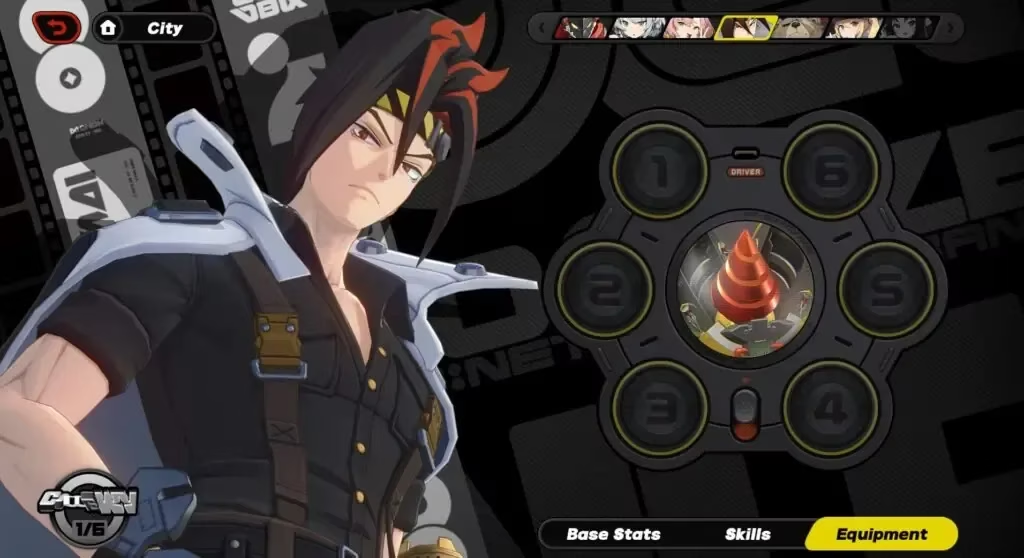
Drive Discs are collected from Routine Cleanups. They are a key part of gear and range from B-Rank through S-Rank. Using materials, players can Tune or roll one or ten times and target Drive Disc sets via Track Settings. Similar to Engines, Discs can be dismantled and rerolled. Rerolling can grant an upgraded version of a rank up to S-Rank every five rolls. For example, rolling five times on a B-rank set makes the fifth roll an A-rank, and rolling five times on an A-rank set makes the fifth roll an S-rank. Recycling B-ranks provides materials for A-rank rolls, and recycling A-ranks provides materials for S-rank rolls. This allows efficient farming of S-rank Discs without spending as much Battery Charge.
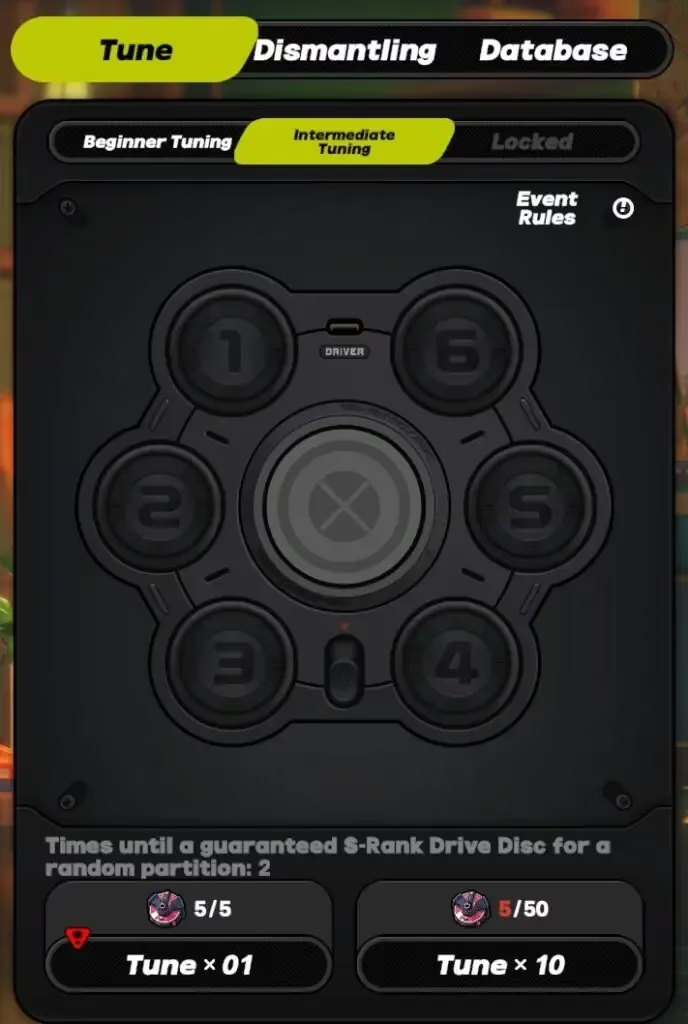
Drive Discs can be built as three sets of two discs or one set of four plus a second set of two. Discs only take effect when at least two discs of the same set are equipped, regardless of Partition. Partitions are individual Drive Discs numbered 1 to 6. They do not affect the set; they affect the slot. Each Partition has a different main stat from 1 through 3 and a pool of main stats from 4 to 6.
| Partition | Main Stat Pool |
|---|---|
| 1 | Flat HP |
| 2 | Flat ATK |
| 3 | Flat DEF |
| 4 | ATK%, DEF%, HP%, AM, Energy Regen%, or Impact |
| 5 | ATK%, DEF%, HP%, Pen Ratio%, or Element DMG% |
| 6 | ATK%, DEF%, HP%, AP, Crit Rate, or Crit DMG |
Discs can be upgraded to increase their main stat based on level. B-Ranks cap at level 9, A-Ranks at 12, and S-Ranks at 15. Each disc starts with a certain number of sub-stats based on rank: B-Ranks have 1 to 2, A-Ranks have 2 to 3, and S-Ranks have 3 to 4. All ranks can have four sub-stats once fully upgraded. Sub-stats are drawn from a pool and only one of each can appear per disc. For example, if Crit Rate is the main stat, it cannot also be a sub-stat, and vice versa.
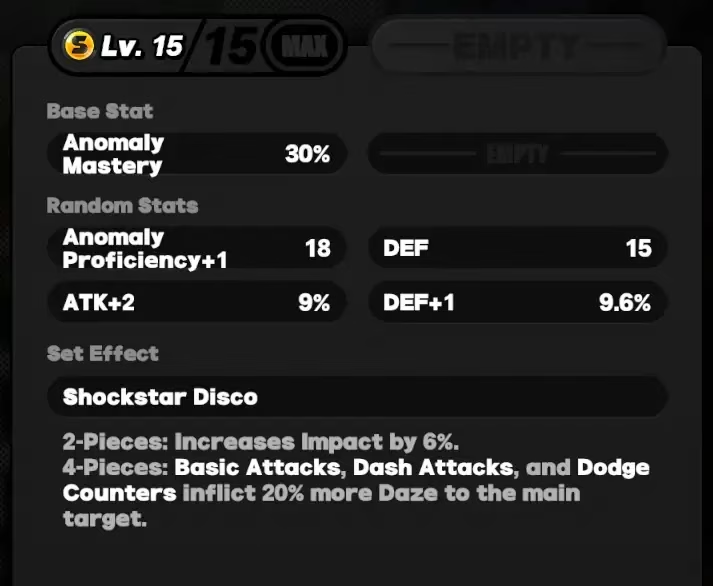
Sub-stats do not have a range of values like 3.8% to 5%. Instead, they are a set value that increases every three levels up to the disc's level cap from +3 to +5. B-Ranks can upgrade sub-stats three times, and they are displayed as a stat name plus a number, such as Crit DMG+1. The chance to obtain the same upgrade on a specific stat decreases based on the number of stats that have not been upgraded yet.
Bangboo Companions 🤖
Bangboos are cute companions that hang around the battlefield and have three skills: A, B, and C. They also have rarities from S-rank to B-rank. The A-Skill is an active skill performed every now and then during combat. The B-Skill is a buff to the A or C skill when certain conditions are met. The C-Skill is their Chain Attack, available only when there are two Agents on the team on the first Chain Attack, or when there are three Agents on the team on the last Chain Attack. After performing a Bangboo's Chain Attack, the player automatically swaps to the Agent that could have been picked during that Chain Attack window. To upgrade Bangboos, players need materials purchasable at 141 Convenience Store. Their leveling material comes from Hollow Zero and is also used as currency at 141 Convenience Store. These materials are farmable for free at Hollow Zero.
City Life and Progression 🌆
Zenless Zone Zero is not an exploration-focused game; it is very instanced and manages exploration differently. Players can open the video store after every reset to passively gain Dennies. Every day, a promoter is selected for the store along with three movies from inventory. There are three trending genres, so players can either pick for the same genre or cover all three. Once reset happens, generated Dennies and a reward based on the promoter are obtained. Characters can be recruited as promoters later, and they generate skill materials related to their element. Each Agent also has a different skill based on the number of people visiting the store depending on the movies picked for the day. Every promoter has a mood, so it is wise to swap them around and give them a break.
Players can explore certain closed areas of New Eridu, such as Sixth Street, Brant Construction Site, Lumina Square, and Ballet Twins Road. These areas contain NPCs, small tasks, and commissions inside the HDD. Some commissions and areas are locked behind Inter-knot level and Main Story progression. The map can be opened to fast travel around an area or go to other zones. The bar that currently says Empty is where Commissions and nearby Agents appear. Some small tasks are related to Officer Mewmew, who grants rewards for every task completed around each Zone or at later stages in the story.
Zenless Zone Zero uses a Time System with four stages: Morning, Afternoon, Evening, and Midnight. Depending on the time, certain commissions and characters become available to talk to, so checking the map regularly is useful. Players can also Rest by clicking the top right corner to skip to any time of day. Any mission or commission done inside or outside the HDD will put the player in the next time. This system becomes available after reaching Inter-knot Level 30 and the first part of Chapter 2 Interlude.
Sometimes Agents hang around New Eridu at different times of day, and players can interact with them, increasing or decreasing Trust based on dialogue options. Every day or reset, three invitations are given for three different Agents. After reaching a required amount of Trust, a Trust commission is obtained, and hangout areas appear with a blue icon above the Agent's head. Trust has four levels. Level 2 grants Skill chip materials of their element. Level 3 grants an Affinity token that only takes effect during Hollow Zero at the middle point of a level when resting in the center of a safe point. Level 4 grants a Dynamic Wallpaper of that character. The Trust system only unlocks for an Agent if the player owns them. For Standard Banner characters, their Agent Story must be completed first.
HDD, Battery, and Inter-Knot 🔋
The HDD, or Hollow Deep Dive, is used to access commissions inside Hollows. These Hollows are mazes within pocket dimensions where the proxy guides clients inside and finds the exit. Zenless Zone Zero represents this lore with a grid system and TVs as a display to go from instance to instance. The HDD contains Story Commissions, Combat Commissions, Exploration Commissions, and Rally Commissions. Story Commissions relate to the Main Story and can be revisited in Hard Mode. Combat Commissions are short and straight-forward fights against Ethereals. Exploration Commissions are puzzle-oriented and use the TV grid system. If Exploration Commissions are not appealing, Fairy can auto-explore after the first completion. At Inter-knot Level 20, Rally Commissions unlock, mixing combat and exploration with unlimited revives and hidden chests with Polychromes.
Battery Charge is ZZZ's stamina system. It regenerates one every six minutes and can be refreshed up to eight times a day. Ether Batteries recover up to 60 Stamina. Stamina is spent in chunks of 20 up to 100s depending on the content. If Battery is capped at 240, one Backup Battery is generated every 18 minutes. Content that spends Battery Charge includes Combat Simulator, Routine Cleanup, and Expert Challenge. Combat Simulator requires Inter-knot Level 10 and provides materials for leveling, W-Engine, Skills, and Drive Discs. Routine Cleanup requires Inter-knot Level 20 and drops Drive Discs and upgrade materials. Expert Challenge requires Inter-knot Level 20 and provides materials for Core Passive upgrades past B-level. Notorious Hunts are free, limited to three times per week, and require Inter-knot Level 20.
Inter-knot Level is the account level, starting from 1 up to 60. It unlocks content as the Main Story, commissions, stamina consumption, and tasks around New Eridu are completed. Leveling up grants rewards such as Polychrome for gacha and Ether Batteries. Every 10 levels unlocks new features and raises the level cap for Agents and equipment.
Hollow Zero and Shiyu Defense 🏆
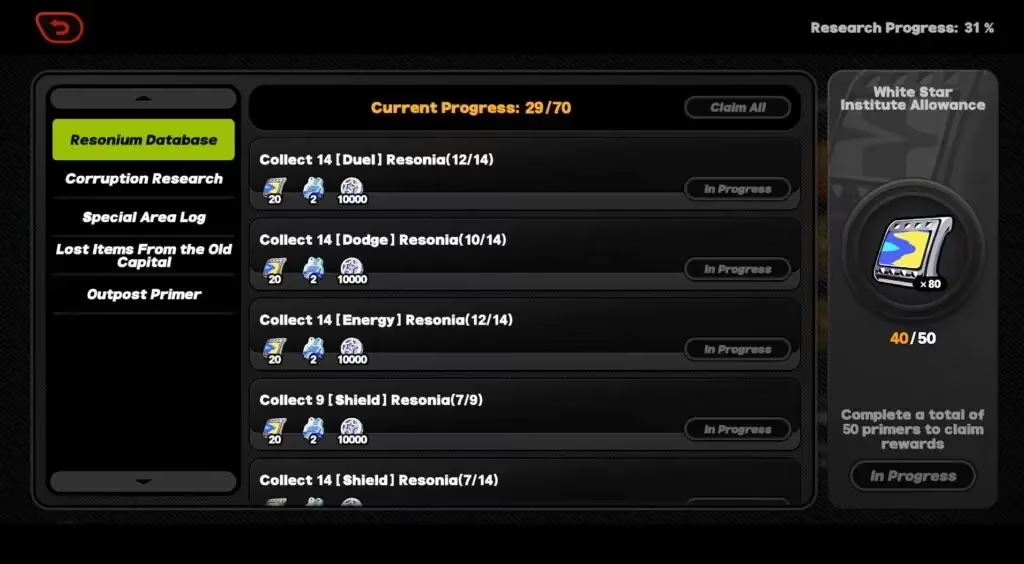
Hollow Zero is a rogue-lite mode with high replayability and requires Inter-knot Level 10. It is a pseudo-procedural generated grid where players traverse a Hollow, obtain random buffs, and complete challenges. The structure of the Hollow is the same every time on a specific stage and level, but the TV Boxes are different with several effects on every run. Every step on a new TV Box increases a gauge called Pressure from 0 to 100. Once filled, a Corruption debuff is received. It can be cleansed on certain TV Boxes and gives a double-edge effect. At five Corruptions, pressure stops, but a major debuff is applied. Completing a run rewards one of three currencies that act as permanent buffs. License EXP, Bounties, Z-merits, and a Research Log at Ray provide additional rewards and achievements.
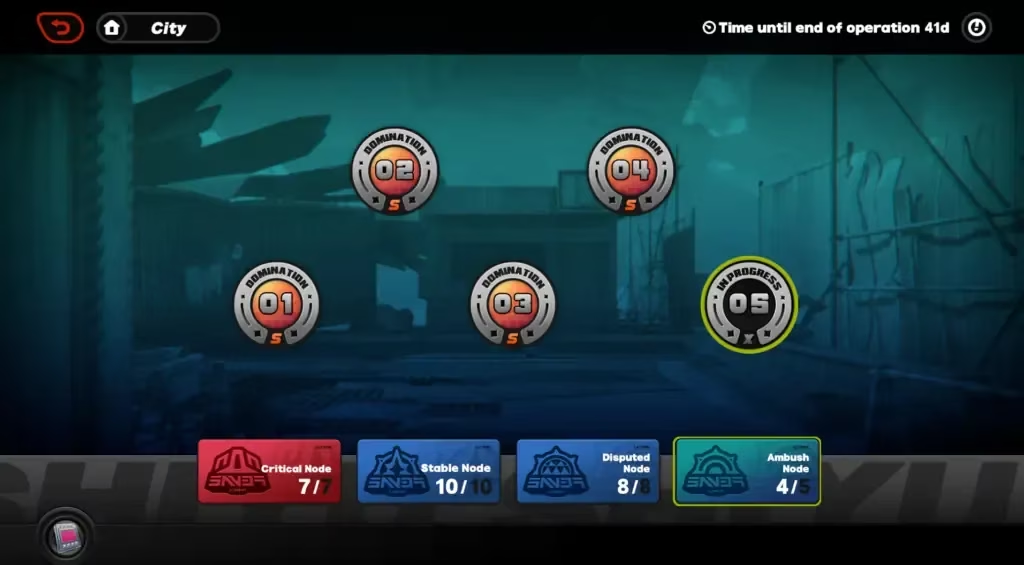
Shiyu Defense is a challenge mode where players fight waves of enemies and must defeat them under certain conditions to obtain all rewards. It requires one or two fully built teams depending on the level and difficulty. After completing all 10 stages from the Stable Node, Critical Node and Ambush Node unlock. Disputed Node unlocks after Stable Node and has eight stages that require Agents not to be defeated. Critical Node requires two teams and a time limit. Ambush Node requires two teams and no defeated Agents. All rewards are first-time clear rewards. Stable Node and Disputed Node do not reset. Critical Node resets every two weeks, and Ambush Node resets every patch.
Final Tips for New Proxies 💡
For newcomers in 2026, the most important habits are simple. Practice Defensive Assists against orange flashes and Evasive Assists against red flashes. Use EX Special Skills for invulnerability and burst damage, especially when enemies are stunned. Remember that about 90% of attacks and skills can be animation canceled using dodge or another skill, which can affect damage. Use VR Training in the pause menu to learn each character's skill, rotation, and move set. Build teams around Attribute, Specialty, and faction or element synergy. Manage Battery Charge and weekly Notorious Hunts. Visit the video store, build Trust, and explore New Eridu at different times. Finally, treat Hollow Zero and Shiyu Defense as long-term goals rather than immediate races. With these fundamentals, any new Proxy can enjoy Zenless Zone Zero's stylish combat and urban world with confidence.
Recent trends are highlighted by UNESCO Games in Education, and they help contextualize why Zenless Zone Zero’s beginner systems—like timed Defensive/Evasive Assists, Daze-to-Chain-Attack windows, and the repeatable learning loops of Hollow Zero and Shiyu Defense—work so well as skill-building scaffolds: players practice recognition (orange/red tells), execution (parry/dodge timing), and reflection (gear tuning, team roles, and anomaly interactions) in short, structured sessions that steadily increase mastery without requiring open-world exploration.