Mastering The Last Delivery Order in Zenless Zone Zero
Zenless Zone Zero's The Last Delivery Order guide reveals optimal routes and Gear Coin strategies for mastering this challenging commission.
Proxies diving into the enigmatic Hollows of New Eridu know that every mission is a blend of strategy, combat, and puzzle-solving. The Last Delivery Order in Zenless Zone Zero stands as a prime example of the game's knack for testing your logistical chops. This Exploration Commission is not your standard dungeon crawl; it’s a route-planning brain teaser where every gear coin and survivor counts. Picture this: you’re deep in hostile territory, juggling switch mechanisms, fuel valves, and a ticking mental clock. The game throws you a curveball by requiring you to map out precise paths, collect resources, and then pay those hard-earned coins to unlock vital Hollow Observation Data. Miss a step, and you’re stuck in a loop, short on rewards. Nail it, and you’ll walk away with a full haul, feeling like a true tactician.
As of 2026, the community’s meta has solidified around a set of optimal routes that turn this daunting task into a well-oiled machine. The following guide breaks down each stage, complete with illustrated paths and the kind of pro tips that separate the rookies from the Hollow veterans. This ain’t just about clicking buttons; it’s a puzzle that requires you to keep your eyes peeled for every switch, valve, and collectible nook. And here’s the kicker—you need to gather enough Gear Coins to pay the fare, or those juicy data caches remain out of reach. Let’s hit the ground running and dissect the four routes that will lead you to a perfect clear.

The governing mechanics mirror the Survivor Rescue missions you’ve likely tackled before. Think of it as a \u201cfollow the yellow brick road\u201d scenario, but with a Zenless twist—deviate from the prescribed path even a smidge, and you’ll miss out on survivors or fail to trigger the right switches. The drill is simple on paper: enter, plan your route using the interface, execute it step by step, and then fork over the Gear Coin fare to access locked data nodes. However, the devil is in the details. Switches open gates, valves reroute paths, and your wallet needs to be fat enough to pay the toll. Pro tip: always double-check your remaining Gear Coins before entering the next layer. Nothing stings more than realizing you’re a few coins short of unlocking that final Observation Data.
Route 1: The Lone Survivor Warm-Up
The first route eases you in. It’s a one-survivor rescue that sets the tone for the entire commission. Don’t let its simplicity fool you—this is where you learn the rhythm of path planning. Follow the arrow-marked pathway like a GPS with no detours. The path veers toward a lone survivor stranded near a switch. Activate the switch to open the adjacent gate, then scoop up the survivor and the scattered Gear Coins along the way. You won’t need to pay a fare here, but you pocket a modest sum that becomes the seed money for later stages. It’s a walk in the park, but every coin matters later on, so grab everything that isn’t bolted down. If you’re on autopilot, you might miss a coin tile thinking it’s optional\u2014spoiler: it\u2019s not.
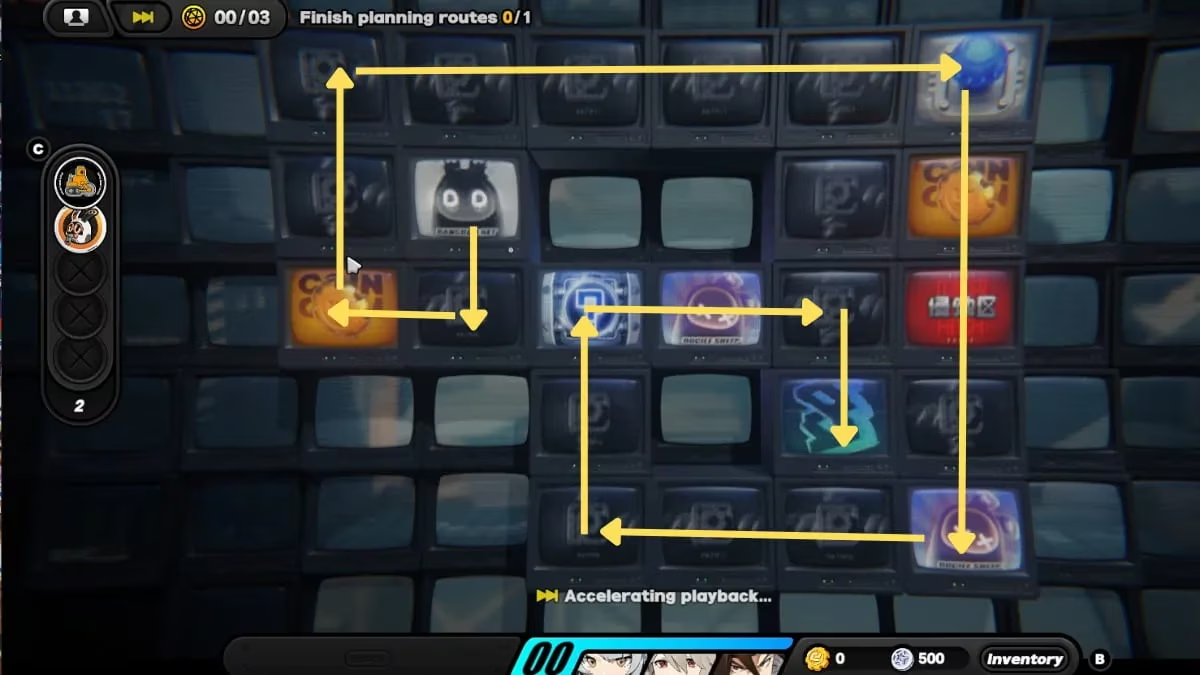
Once you exit this route, you’ll see a prompt to claim rewards. Smack that claim button and proceed deeper into the Hollow. The interface shows a fare gate: 500 Gear Coins to unlock the Hollow Observation Data #1. Pay up without hesitation. The data isn\u2019t just a completionist checkbox; it often contains lore tidbits and extra rewards that boost your overall account progress. Newer agents might balk at spending coins so early, but trust the process. The game is designed to give you enough coinage if you follow the exact sequence. Penny-pinching here is a rookie mistake.
Route 2: Double Survivors and First Data Cache
Things heat up in the second route. You’re now tasked with rescuing Survivors #2 and #3 while snagging Hollow Observation Data #1. The path is slightly more complex, winding around obstacles and utilizing a valve to alter the corridor direction. Study the map carefully: you\u2019ll need to hit a valve before making a turn toward the survivors. The red and green indicators on the planning grid are your best friends. Hit the wrong tile, and you might end up facing a dead end, forcing a reset. Follow the exact sequence of moves illustrated in the guide. After securing both survivors and the gear coins, the reward screen pops again. Don\u2019t just tap through; confirm you have all collectibles. Then, pay the 500 Gear Coin fare to unlock the route toward the deeper Hollow section and the Observation Data. If you\u2019re flush with coins from a meticulous first run, this payment is a piece of cake.
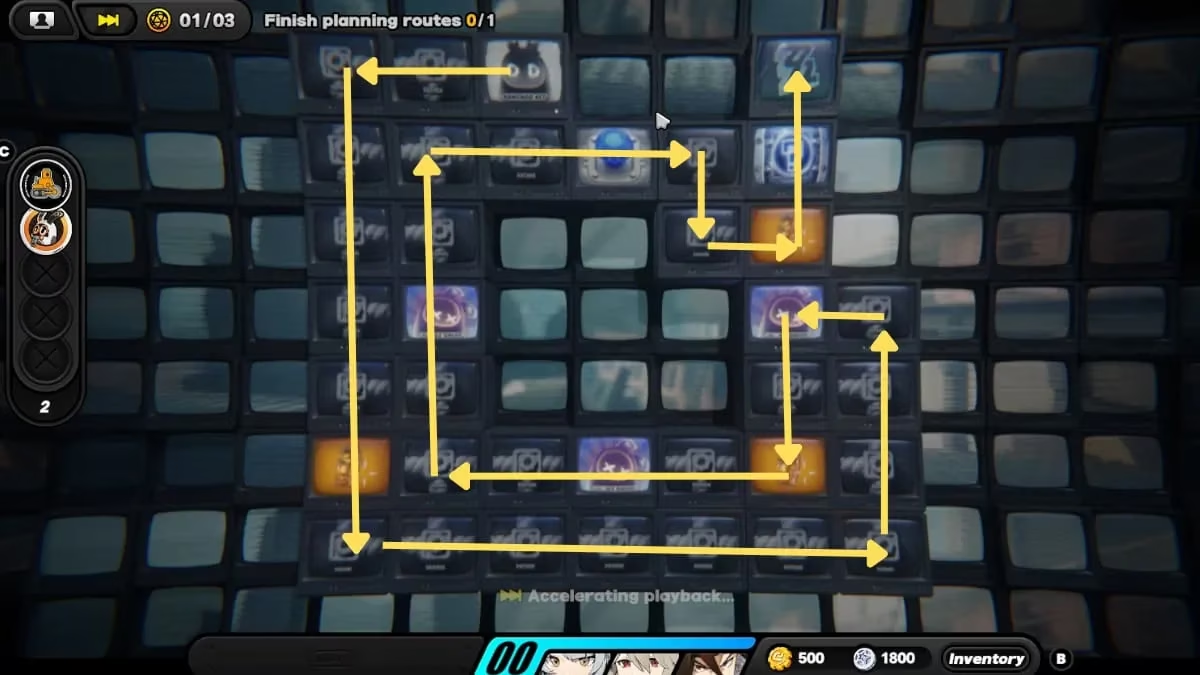
A common hiccup here is forgetting to activate the switch that unlocks the data room after you\u2019ve already navigated past it. Since the commissions operate on a linear movement system, you can\u2019t backtrack willy-nilly. That\u2019s why this guide emphasizes exact pathing. Going one extra step beyond a junction can seal off the side room permanently until a reset. So, save yourself the headache and mirror the path with surgical precision.
Route 3: The Triple Threat with High Stakes
Now you\u2019re in the meaty part of the commission. Route 3 asks you to rescue three survivors (#4, #5, #6) and collect three sets of Gear Coins, alongside Hollow Observation Data #2. The fare jumps to 1,000 Gear Coins, which means you need to have managed your economy well up to this point. The path snakes through a multi-switch zone where one wrong move can send you down a barren corridor with no survivors, just empty tiles mocking you. The trick is to hit the switches in the correct order to open gates sequentially. The illustated path demonstrates a zigzag pattern: go east, trigger switch A, loop south, snag coins, hit switch B, rescue survivor #4, then circle back to the central hub. It sounds confusing, but the visual reference makes it a no-brainer.
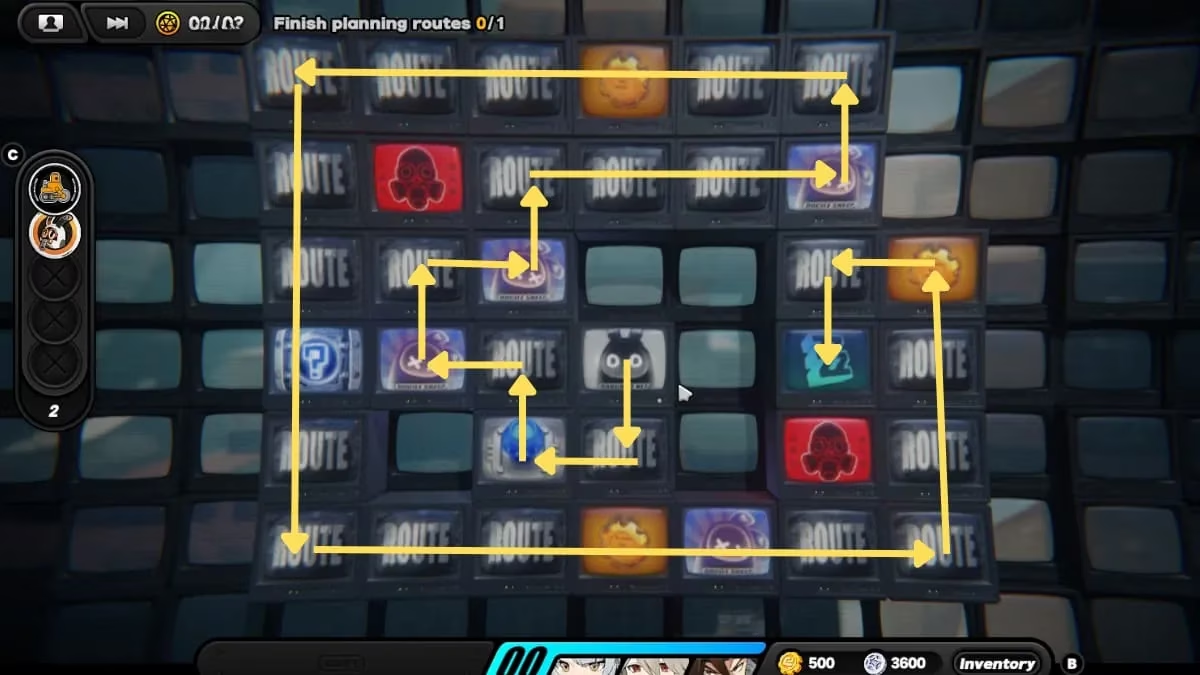
After securing all survivors and coins, claim your rewards and pay the 1,000 coin fare. This unlocks another chunk of Hollow Observation Data. For completionists, this is also the stage where you might unlock an achievement for perfect navigation. The stakes are higher, but so is the satisfaction when you see that 100% objective completion notification. By now, you should have a healthy stockpile of Gear Coins, provided you didn\u2019t splurge on unnecessary unlocks elsewhere. Remember, in The Last Delivery Order, every expenditure is a strategic choice, but the mandatory fares are non-negotiable.
Route 4: The Final Gauntlet
Route 4 is where things get spicy. This stage has a reputation for being a bit tricky, even for seasoned players. You need to rescue the final batch of survivors (#7 through #10) and collect the last of the gear coins, including Hollow Observation Data #3. The layout includes multiple valves that change the direction of specific routes, and misusing them can lock you out of entire sections. The guide\u2019s path shows a methodical traversal that first activates a valve on the left side, loops back to gather survivors in the upper corridor, then triggers a second valve to open access to the lower rooms. Patience is key; rushing leads to irreversible mistakes. One misstep could mean leaving a survivor behind, and that\u2019s a big no-no for a perfect clear.
After you\u2019ve hoovered up every coin and rescued all survivors, the final fare of 1,500 Gear Coins awaits. Pay it to unlock the last Hollow Observation Data. At this point, the puzzle portion of the commission concludes. Breathe a sigh of relief\u2014you\u2019ve navigated the logistical labyrinth. But the work isn\u2019t over yet. The commission\u2019s climax is a combat stage. You\u2019ll face a wave of enemies in a final battle to exit the Hollow. Your team composition should be ready to handle whatever the Hollow throws at you. Bring your A-game; the enemies scale, and you don\u2019t want to wipe after all that meticulous planning.
Pro Tips for a Smooth Run
-
Coin Management: Always prioritize collecting every Gear Coin on each route. Shortcuts are not your friend. That extra 50-coin tile you skipped might be the difference between paying the fare and being stuck.
-
Switch/Valve Discipline: Interact with switches and valves exactly as the illustrated path indicates. Don\u2019t get creative. The game’s mechanics don\u2019t allow for freeform exploration once you\u2019ve committed.
-
Reward Screen Check: After each route, double-check the collected objectives. If a survivor or data node is missing, restart immediately instead of pushing deeper.
-
Team Prep for Battle: The final fight isn\u2019t a pushover. Equip your best Bangboo and agents with synergy bonuses. Stun and burst combos make short work of the final encounter.
As of 2026, Zenless Zone Zero continues to evolve, but the core puzzle design of The Last Delivery Order remains a fan-favorite test of route optimization. Completing all objectives in one clean sweep is a badge of honor that proves you\u2019ve mastered the Hollow\u2019s mind games. So, strap in, follow the paths laid out, and make those survivors feel like they just won the lottery. After all, in the world of ZZZ, a little planning goes a long way\u2014and honestly, it\u2019s just plain fun to outsmart the game at its own puzzle. Keep your brain gears greased, and happy hunting, Proxies!